If you have saved a lot of pictures and/or home
videos on your computer and now need to prepare a nice presentation,
want to send DVDs to your relatives, or just want a nice way to store
your media before it completely takes over every kilobyte of storage
space, you’re covered: Microsoft’s DVD Maker program is a simple, fast,
and efficient way to create DVDs that will play in most computers and
even DVD players.
Unlike versions of
Windows before Vista, Windows 7 comes with a DVD-burning application
built in to the OS. You can open the DVD burner by choosing Start, All
Programs, Windows DVD Maker (see Figure 1).
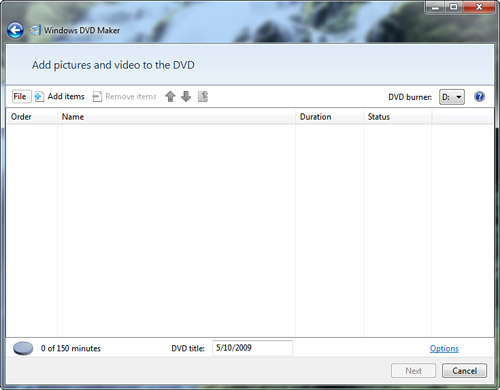
From this screen, you can
click Add Items and browse for video files or still photographs. After
you select the movie files or pictures, they appear in the main screen
in the order in which they will be played on the DVD.
Tip
If
you want to make a quick slideshow from pictures stored on your
computer, click Add Items and Ctrl+click any pictures you want to add.
Windows DVD Maker makes a slideshow out of the photos you selected; you
can change the order in which the slides are presented in the main
screen. |
When you have the media
elements in the order you prefer, you can change the advanced options
for the DVD by clicking the Options link to open the DVD Options dialog
box (see Figure 2).
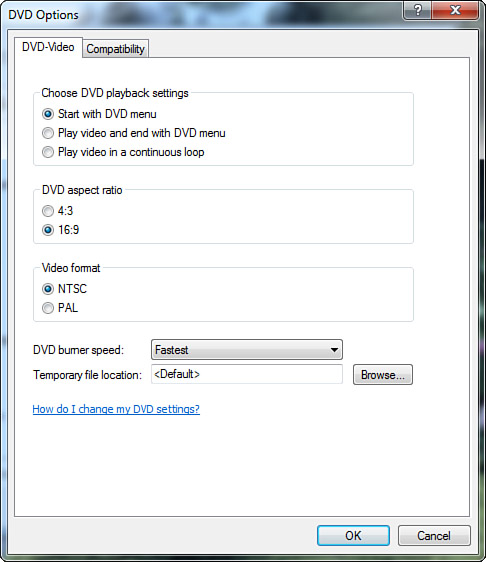
The first set of options on
the DVD-Video tab controls how you see the video after the DVD is put
in the DVD player—whether you start with a menu or start with the video.
The second set of
options controls the aspect ratio for the DVD. Changing this option to
16:9 enables you to create widescreen DVDs suitable for playing on
high-end TV sets. If you play a movie that was encoded with the 16:9
aspect ratio on a standard TV set (4:3), the movie will be “letterboxed”
(have black bars at the top and bottom of the movie). This is to allow
standard TV sets and computer displays to show all the content from a
widescreen movie without losing any content.
The
standard aspect ratio (4:3) allows standard TV screens to use the
entire screen for displaying the movie, but on widescreen TVs the movie
will be “pillar boxed” (have black bars on either side of the movie).
The format you use depends mainly on your source media.
The third set of options
enables you to use either the National Television System(s) Committee
(NTSC) or Phase-Alternating Line (PAL) format for the video. NTSC video
is the format of choice for the Americas as well as some Asian
countries; PAL is used most everywhere else. Unless you need to play the
movie you’re creating on a PAL-compliant DVD player, it’s generally
best to leave the setting as NTSC.
You can also change the
DVD burner speed. This should be set as high as you can without creating
“coasters” (DVDs that had a failure during writing, rendering them
useless). Another area where you may have problems is with plug-ins or
filters that cause compatibility issues with DVD Maker. Under the new
Compatibility tab, you can select which filters DVD Maker will use or
try to access and, therefore, eliminate that one possible conflict.
Of course, the only time you would experience this is if you had
installed other DVD authoring software, and if that were the case you
likely would not be using DVD Maker.
When you finish on the main pane, click Next. You are presented with the Ready to Burn DVD dialog box, shown in Figure 3.
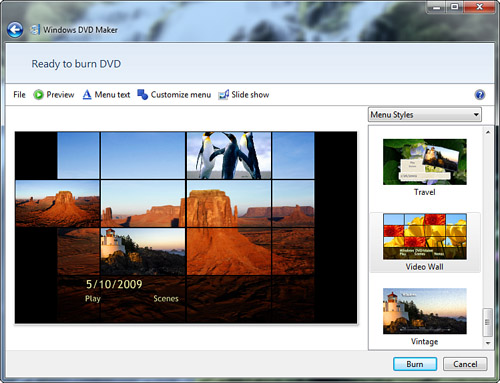
From this dialog box, you
can change the style of the menus for the DVD movie, change the text
and/or styles for the menu, or modify the settings for the slideshow in
the movie. By clicking the Slide Show button in the toolbar, you can add
audio to the slideshow or change the other settings for the slideshow
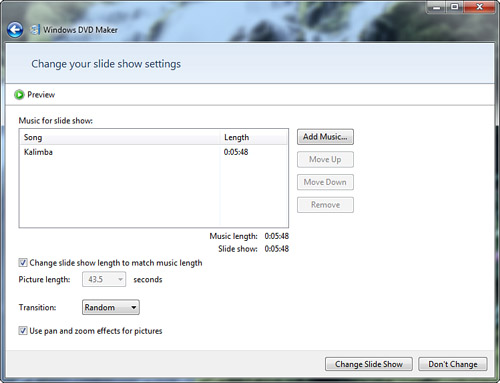
(see Figure 4).
Tip
If
you want to make multiple copies of the same movie, it is best to do it
now; by burning multiple copies at once, you bypass the lengthy
encoding phase. If you are unable to burn another copy, you can always
create copies from the one DVD you did burn. You will require software
like Nero Burning ROM or Roxio’s Easy DVD Copy 4. |
After you add music to the
slideshow, change the length of time between slides, and change the
transitions, you can preview the slideshow by clicking the Preview
button. When you’re satisfied with the show, click the Change Slide Show
button.
When
everything is completely ready to go, click the Burn button. If you
don’t have a blank DVD in the drive, you’re prompted to insert one. From
here, make a cup of coffee and go to lunch; burning a DVD generally
takes much longer than burning a CD, not only because a DVD can hold
more data, but primarily because it takes a long time for the software
to properly encode your source media to work as a DVD.
The DVD Maker encodes the
movie, which is very CPU intensive. After the movie is encoded, DVD
Maker burns the DVD, ejects it, and gives you the option to burn another
copy of the DVD you just created.
I
constantly get errors when writing DVDs in Windows DVD Maker, and the
DVDs I create don’t play in either a standalone DVD player or my
computer. Writing DVD
files can sometimes be a tricky and resource-intensive task. Many modern
DVD drives have more than enough file cache to prevent buffer underrun
errors but, as with CDs, sometimes problems happen. The best way to
prevent underrun errors when burning a DVD is to choose a slower burning
speed in the DVD Options dialog box of the movie in |